How to Quickly Edit and Compile Screenshots to Make Awesome Featured Images and Tutorials
We tried to come up with a simple, yet functional tutorial for beginners on how to create screenshots for articles and compile them into decent-looking featured images you can use in your tutorials, on your blogs and websites. Knowing these basics can save you the headache of looking for a featured image for a blog post, and safeguard your website from copyright claims, which can significantly damage your blog's positions in SERPs. Let's get this done quickly and efficiently.
In this tutorial, we summarized a few simple ways you can:
1. Take screenshots, resize them and save them into image files.
2. Edit screenshots: add arrows, underline or highlight an area in a screenshot, blur an area (for example, when you do a screenshot of an email app you may want to blur your email address)
3. Compile several screenshots of the same size on a single custom-selected canvas for a more professional-looking featured image or strip of images, or basic introduction into Layers.
Part I. How to Take a Screenshot [Windows, Android, iOS]
How to Take Screenshots In Windows
If you want to capture the active window, i.e. the window you are currently using, press Alt+PrntScr.
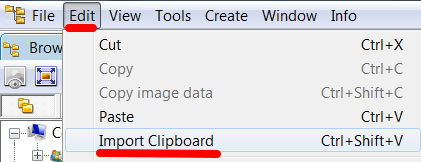
Open your image editor (in this tutorial we used XNView) -> press Ctrl+Shift+V [or go to Edit-> Import Clipboard] -> you just pasted the captured screenshot.
If you want to capture the entire screen with all the windows on it, which is sometimes necessary when you need to show a feature path, just hit PrntScr -> go to XNView -> Edit -> Import Clipboard.
From there, you can crop the image and select the exact area you need: Edit -> Crop or click on the Crop icon.
To resize a screenshot in XNView, hit Shift+S or go to Image -> Resize.
You will see quite a simplistic window where you can adjust the height and width of your screenshot. If you want it to look natural, check the box next to Keep Ratio, and adjust the most critical parameter. For horizontal images, adjust width; for vertical - height. In this tutorial, most full-scale images are 632 pixels wide.
Next, save your screenshot by hitting Ctrl+S or go to File -> Save As. You may want to save files in PNG format since PNG files weigh less than other formats.
Also, XNView has a convenient way of adding watermarks to images.
Also, you may want to check out these tutorials for screen capturing:
- How to Screen-Capture a Fixed Region Instead of a Regular Print Screen in Windows
- How to Take a Screenshot of a Page in Chrome or Firefox using Browser Extensions and Add-Ons
- How to Resize any Window to a Specific Size
- How to Resize a Google Chrome or Firefox Window to a Specific Size
How to Take a Screenshot in iOS
1. Open the window you want to capture.
2. Press and hold Home + Sleep/Wake buttons simultaneously.
3. After a distinct shutter sound, you will find your screenshot in Photos -> Camera Roll.
We assume you know how to transfer the screenshots from your mobile device to your desktop computer for further processing. If not, connect your iPhone or iPad to your computer via USB wire and:
In Windows
My computer -> iPhone device or Import from Camera.
Also, you can install iTunes and synchronize photos from your iOS device with your Win laptop or PC.
Starting from Win 7, the PC system should be able to see your iOS device as a Photo Camera.
Additionally, iExplorer works with Mac and Win alike, so you can use it to move files, too.
How to Take A Screenshot in Android
1. On Android 4.0+, open the window you want to capture and long-press Volume Down + Power buttons for 3-5 seconds.
2. After a shutter sound, you will be able to find your screenshot in the Images folder (on my device, it's under Pictures -> Screenshots).
From there, just connect your mobile device to your computer and select the screenshots you want to copy to your PC or laptop for further editing.
From there, once you saved the screenshots from your mobile device, you can resize and rename them in your image editor.
Part II. Adding arrows, highlighting, blurring select areas in screenshots.
There is an overwhelming multitude of free image editors that do all sorts of cool transformations, so we will name just a few of them.
For offline editing, try Skitch by Evernote.
It does not require registration, but if you have an account with Evernote, you may find it even more appealing. By default, it installs with the 'run at system boot' option, but you can turn it off easily.
Now, the greatest advantage of Skitch is that it allows you to both capture screenshots, select areas, and add arrows, shapes, underline and blur select areas, which is the perfect thing for tutorial screenshots. However, I found its screenshot capturing feature less convenient than the above-mentioned Alt+PrntScrn in XNView.
You may want to check out Lightshot and Awesome Screenshot, PicMonkey and Sumopaint, as well as BeFunky for a multitude of free image effects, but those tools work online only.
Part III. Compile several screenshots (or text) on a user-selected canvas to create featured images.
Here comes the most time-consuming part, but it's only time-consuming the first time you do it. Once you understand the basics of how the layers work, you will be able to create awesome looking featured images for your blog posts.
To compile several screenshots on a custom canvas, we will offer two options - offline and online.
a) For offline editing, we used GIMP image editor - it's free and highly functional, and you can also use it to save, resize and add text to screenshots.
Simply put, you need to select a base image, which would serve as a background for your screenshots. This can be anything from a desktop wallpaper to the image of a starry sky - you're the boss.
Say, you want to make an image with a background and three vertical screenshots of an Android app on it. Before you start, it's advisable you resize your canvas image to the desired size in pixels.
To make it quick in Gimp, you need to remember two simple functions -
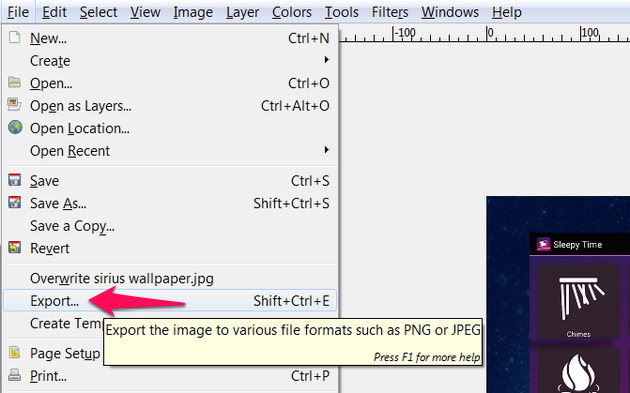
File -> Open As Layers
Layers -> Scale Layer
1. Go to File -> Open as layers -> select your background image. You can then adjust the percentage view of the image to see the full scale picture as you add more layers.
2. File -> Open as Layers -> select the 1st screenshot.
It will appear in its original size, which may need adjustments and repositioning.
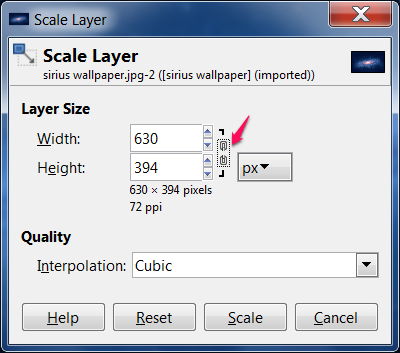
3. Go to Layers -> Scale Layer. You will see the current layer highlighted and a resize window appear where you can adjust the screenshot's dimensions. If you choose the width, you can click on the chain icon located in between the height and width fields, so that Gimp adjusts the height proportionally, i.e. to keep the ratio.
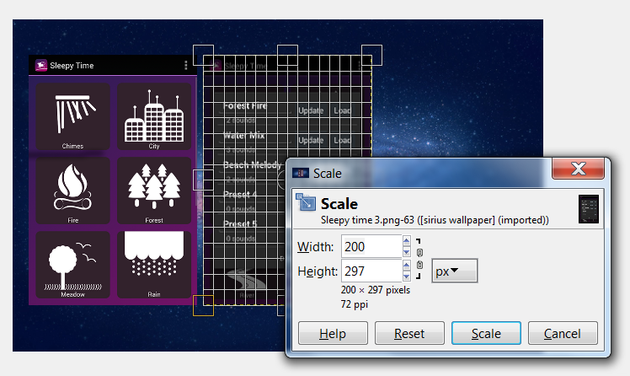
4. From the same Scale Layer window, you can reposition your screenshot by clicking in the middle of it and moving it manually.
5. To add the next screenshot, repeat the procedure: File -> Open as Layers to add, and Layers -> Scale Layer to resize and reposition.
6. To save the image as PNG or JPEG in Gimp, go to File -> Export to -> and export the file with desired name and extension to the folder of your choice.
b) Online editing tools are quite a simple and painless solution as well. We used Pixlr, but if you are familiar with Sumopaint, you will find the layers option there, too.
So, to create multi-layered image in Pixlr, first you should open the website and choose Open Image From Computer, or any other source of your choice listed there, and select the image you will use as a background canvas.
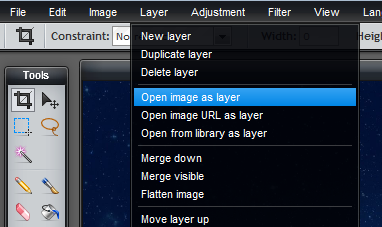
1. To add the 1st screenshot to your canvas, go to Layer -> Open Image As Layer.
This will open the image you selected in its original size, so you may want to adjust its size and reposition it.
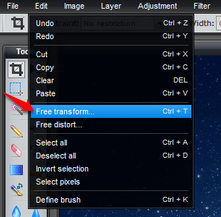
2. To resize and reposition, go to Edit -> Free Transform.
You will see the current layer highlighted, and you can drag the image and resize it manually. The editor will ask you if you want to apply the changes before you can proceed to the next layer.
3. To add the next screenshot, repeat the procedure: Layer -> Open Image as Layer and Edit -> Free Transform to resize and reposition.
4. When you are happy with the output, you can save the resulting image to your computer.
c) To Create Featured Images with Text
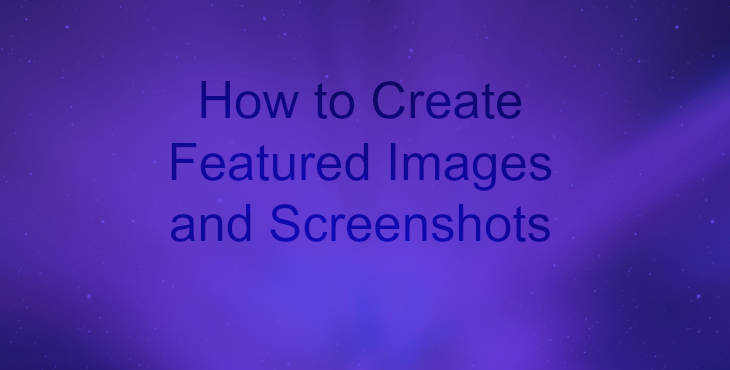
Now, this is the easiest option that has an endless number of options that are mostly online. PicMonkey, BeFunky and SumoPaint have a large number of fonts, themes and awesome effects to make a simple five word title into a good-looking featured image, and all you need to do is browse the fonts, choose the effects you like most and save the result. PicMonkey lets you select image size before you start creating, so the output image is a perfect fit. For a more thorough overview of online image editors, see this comprehensive overview.
Final Words
This is quite a simplistic approach that should work for beginners who don't really need to study image editors in-depth. If you want to use one image editor only, you may resort to Gimp alone. Personally, I like to have my tools available for offline editing, so I am not a big fan of browser extensions, but you may find them more appealing and simple to start working immediately. I suspect there may be simpler solutions, so you are welcome to share your suggestions in the comments below. Hope this tutorial answers some of your needs.
List of apps we used:

