How to Enable or Disable Automatic App Updates in Windows Store
Windows Store is becoming more and more popular every day, especially since the official release of Windows 10. So, if you are not familiar with it yet, then I suggest you take a look at this article in order to learn how to use it. If, on the other hand, you are a more experienced user and would like to configure the Store's settings, then you’re in the right place. In the current article we’re going to show you how to enable or disable automatic app updates in the Store in Windows 10.
You can use 3 different methods we provide for this setting:
Method 1: Enable or Disable Automatic App Updates for your Account Only from the Store
Method 2: Enable or Disable Automatic App Updates for All User Accounts by Tweaking the Registry (Pro and Enterprise users only)
Method 3: Enable or Disable Automatic App Updates for All User Accounts by Using the Group Policy (Pro and Enterprise users only)
Method 3 doesn't work anymore, but you can read our alternative solution.
Note: Update KB3081448 made it possible for Windows 10 Home users to use Method 1, i.e. configure automatic app updates from the Store's native settings (it was only available to Windows 10 Pro and Enterprise users until then). So, if you are running Windows 10 Home and you don't see the setting in Method 1, make sure you've downloaded and installed the KB3081448 update.
Method 1 – Enable or Disable Automatic App Updates for your Account Only from the Store
With this method you can configure automatic app updates for your account only, and it's done via the Store's native settings:
Step 1: Open the Store App
First you have to open the Store app. Simply open it from the taskbar or the Start menu.
Step 2: Go to the Store’s Settings
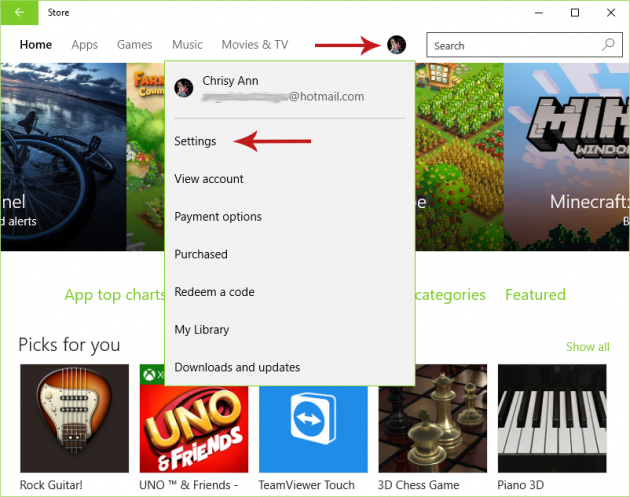
Once the Store app is open, click on your account’s icon next to the search bar to reveal a menu. Select Settings from that menu.
Step 3: Turn On/Off Automatic App Updates
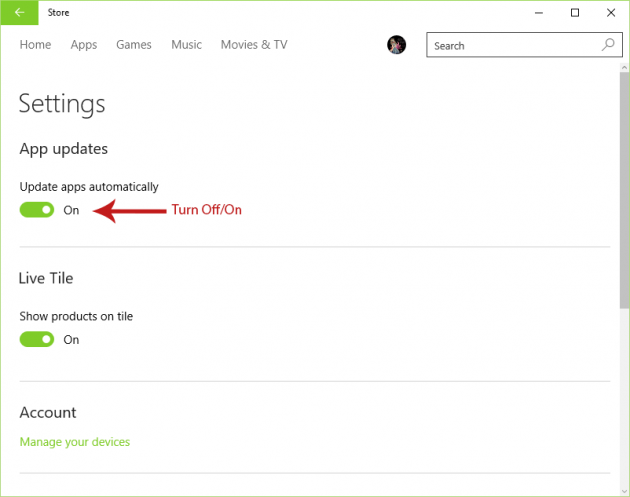
Now you’re in the Store’s settings screen, and the first thing in there is the setting that turns on or off automatic app updates. Just move the slider to enable or disable this feature, and you’re done!
Method 2 – Enable or Disable Automatic App Updates for All User Accounts by Tweaking the Registry
If you don’t want to dig into the registry and perform the changes manually, then you can download the two registry files we provide at the end of this method, which will automatically make the required registry edits and enable/disable automatic app updates in the Store.
Step 1: Open the Registry Editor
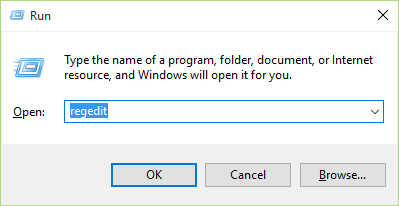
Press Win + R (“Win” is the Windows key in your keyboard) to open the Run dialog box, type “regedit” in it (without quotes) and press Enter to open the Registry Editor.
Step 2: Navigate to the Store’s Registry Key
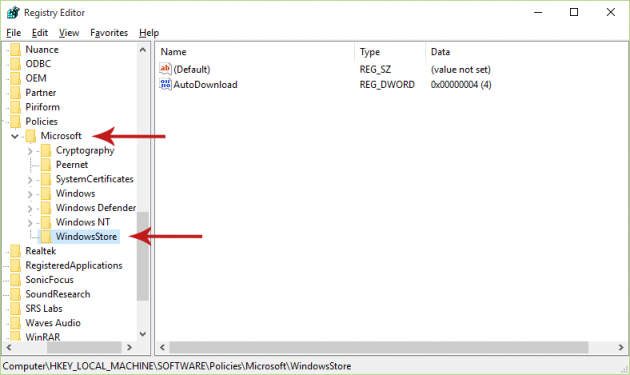
From the left pane in the Registry Editor, navigate to the following registry key:
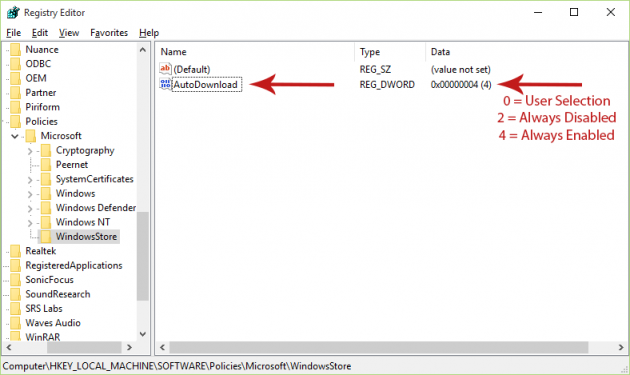
HKEY_LOCAL_MACHINE\SOFTWARE\Policies\Microsoft\WindowsStore
If the WindowsStore does not exist within the Microsoft key, then you’ll have to create it manually. To do that, right-click on the Microsoft key and select New > Key, then rename it to WindowsStore.
Step 3: Create New DWORD Value
Right-click anywhere on the empty space in the Registry Editor's right pane and choose New > DWORD (32-bit) Value to create a new registry value with the name New Value #1 and data set to 0. Rename it to AutoDownload and then change its data to 0, 2 or 4 depending on what configuration you want apply (right-click on it > Modify... and type 0, 2 or 4 in the Data box, then click OK) following the table below:
0 – Let each user configure automatic app updates in the Store's native settings.
2 – Disable automatic app updates for all users regardless of their configurations in the Store.
4 – Enable automatic app updates for all users regardless of their configurations in the Store.
The default setting is the first one (each user decides on his own whether he wants automatic app updates or not), so if you want to go back to the original settings then set AutoDownload to 0 (or completely delete the registry value).
To make your life easier, we provide three registry files that you can use to apply each of the three settings in the registry, as we described in this method. To use them, just download the one that corresponds to the setting you want to apply, double-click on it and click Yes in the confirmation message that appears.
Allow User Selection in Store.reg
Disable Automatic App Updates for All Users.reg
Enable Automatic App Updates for All Users.reg
Method 3 – Enable or Disable Automatic App Updates for All User Accounts by Using the Group Policy
This method used to work on previous Windows 10 development builds, but after the official release of Windows 10 the Policy Templates that used to control the Store's settings were removed. Therefore you can't use the Local Group Policy Editor for this purpose anymore.
However, some users downloaded and installed the policy templates that were part of Windows 8.1, which included the Store's policy templates. Thus, they were able to configure the Store's settings via the Local Group Policy Editor afterwards. Note that this trick is not guaranteed to work.
You can download the Windows 8.1 policy templates from here.
Then, you should be able to navigate to the following directory from the Local Group Policy Editor:
Computer Configuration/Administrative Templates/Windows Components/Store
The policy that should be changed in there is "Turn off Automatic Download and Install of updates". If you do find it, double-click on it to open up a policy configuration window and set the option at the top left corner to Not configured if you want for each user to apply the configuration from the Store's native setting separately, Enabled to force automatic app updates for all users and Disabled to turn off automatic app updates for all users.
If you’re having problems or just want to ask a question, then just post in the comments section below and we’ll try to help you out!

