How to Refresh Windows 10, an Alternative to a Clean Reinstall
When getting a new PC with Windows 8 or 10, you'll notice that it runs pretty smooth at the beginning. After a while, things start to feel a bit sluggish and you might feel the need for a OS re-install. Before you go and do that, you should try the Refresh option included in Windows 8 and 10. It might be just what you're looking for.
Things to consider
The Windows Refresh is similar to what you can do on a mobile device through Reset to factory settings.
When doing a Windows Refresh, this is what will happen:
- Your PC will boot into the Windows Recovery Environment (RE)
- Windows RE will scan your hard drive for settings, data, and universal apps, then puts them all aside, on the same drive
- Windows RE will install a fresh copy of Windows
- Windows RE will restore the previously saved settings, data, and universal apps into the freshly installed copy of Windows
- Your PC will restart into the newly installed Windows
Your files and personalization settings won't be changed, but the PC Settings app will be changed to its default settings.
The apps you installed from the Windows Store will be kept, but desktop software won't. A list of these desktop software will be saved on desktop on the newly installed Windows copy.
After the refresh is finished, an Windows.old folder will be present on your OS partition. It contains all the files of the previous Windows installation and can be deleted.
If your PC comes with a recovery image from your its manufacturer, then Windows 10 will use that image to refresh your PC. If not, you will need a Windows 10 installation or recovery media. Another option would be to create your own custom refresh image.
Note that this tutorial works on both Windows 8 and 10, but it was tested on Windows 10 only.
If Windows loads normally, log in as an Administrator and do these steps
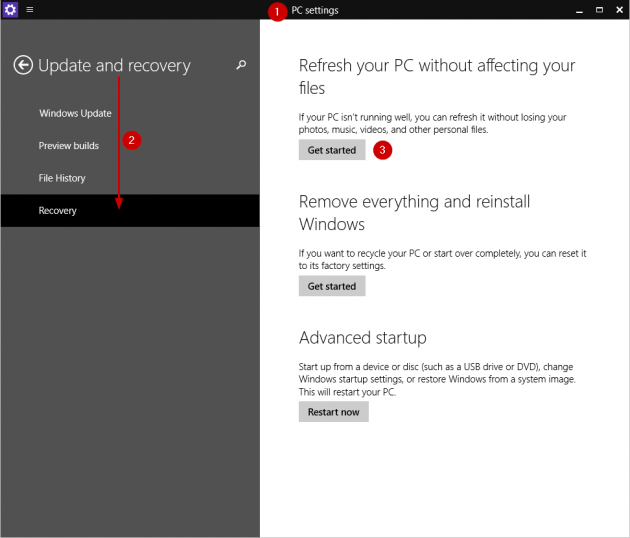
1. Open PC Settings.
2. Go to Update and recovery > Recovery.
3. Choose Get started under Refresh your PC without affecting your files.
4. On the next screen, Windows will notify you of what will happen during Refresh. Click Next.
5. You will see a list of programs that you will need to re-install after Refresh is complete. This list of programs will also be available on your Desktop after the Refresh procedure is completed.
Click Next once more.
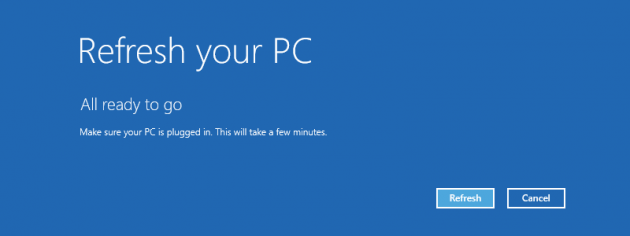
6. On the final screen click Refresh.
Windows will restart and the refresh process will begin.
If Windows does not load properly, you need to access the Refresh option at boot
1. Go to the Boot Options menu using methods 4, 5, or 6 in this tutorial: How to access the Boot Options menu in Windows 8 and 10.
2. Choose Troubleshoot.
3. On the next screen, choose Refresh your PC.
4. If you got to the Boot Options menu from the "Choose an operating system" screen, then you'll need to choose an Administrator account at this point.
If you booted from a recovery drive or installation media, then you'll skip this step.
5. On the next screen you will see a list of changes to be made during Refresh. Click Next.
6. Windows will warn you to keep the PC plugged in during Refresh. Click the Refresh button as shown below in order to start the procedure.
That's all.
Follow this tutorial on how to create a custom refresh image in order to keep your installed desktop programs as well, along with any other Windows preferences you like setting up after a Windows install.


