How to Enable or Disable Fast Startup in Windows 10
Windows 10 has a Fast Startup setting which allows your PC or laptop to boot with faster speed than normal. It works by saving system info to a file called hiberfil.sys during shutdown, so that next time the system boots, Windows will access this file, read the data that was saved in it and subsequently resume your computer’s session rather than start a new one. You could say that it’s a combination of sleep mode and hibernate mode; that’s why it’s also known as hybrid mode.
For more details regarding this setting, you can read the following related articles:
- Explaining Sleep, Hibernation, and Hybrid Sleep in Windows 8
- Hibernation explained. How to delete Hiberfil.sys in Windows 8 or 10.
Fast Startup is turned on by default, but you might want to disable it, or perhaps it was disabled in the past and you are not sure how to turn it back on now. This tutorial will instruct you how to enable or disable it, by using two different methods:
Method 1 (Recommended): Turn On/Off Fast Startup from the Control Panel
Method 2: Turn On/Off Fast Startup by Tweaking the Registry
Note that if you disable hibernation mode, then you won’t be able to use Fast Startup until you enable it again. Furthermore, it should be noted that Fast Startup does not affect restart (i.e. PC is booted normally if you restart, but uses Fast Startup only when it is booted after a shutdown).
Side tip: You can use a desktop Shutdown shortcut as explained here to shut down your PC with Fast Startup (temporarily) disabled, regardless of whether you disabled or not Fast Startup via the settings below. This way, you can have Fast Startup enabled for a regular shutdown that you will use by pressing Start > Power > Shut down, but when you'll use the desktop shortcut for shutting down, Fast Startup will be off until you use a regular Shut down option again.
Method 1 (Recommended) - Turn On/Off Fast Startup from the Control Panel
This is the typical way one can turn on/off Fast Startup in Windows 10:
Step 1: Open the Control Panel
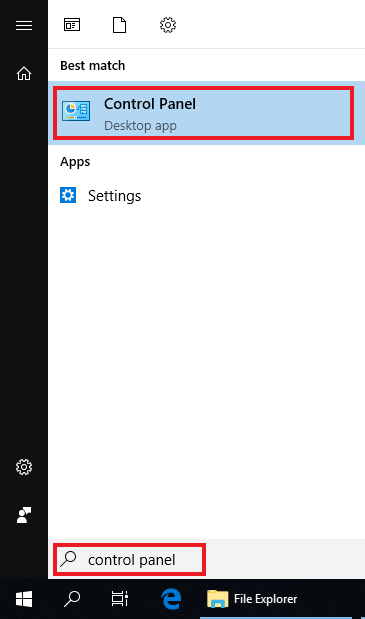
Click Start and type Control Panel. This will initiate a search for "Control Panel". Click on the first result, as shown below.
Step 2: Change Control Panel View to ‘Large Icons’
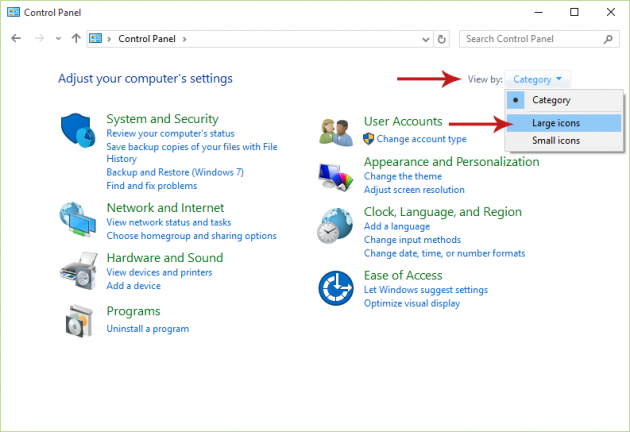
Click on the View by link from the top right corner of the window, and select Large icons.
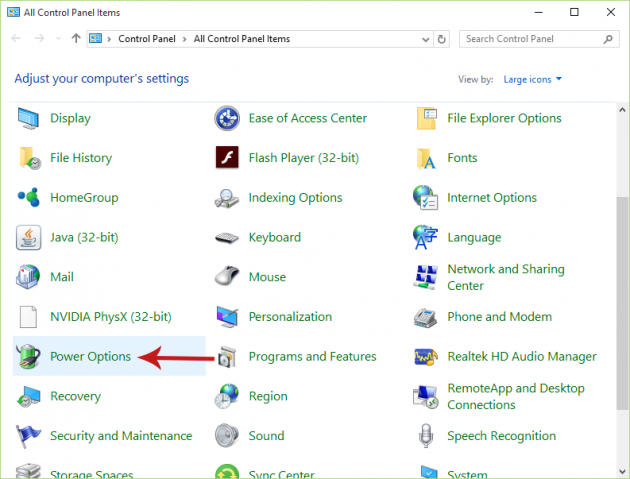
Step 3: Go to Power Options
Now that you’re using icons view, find and select Power Options.
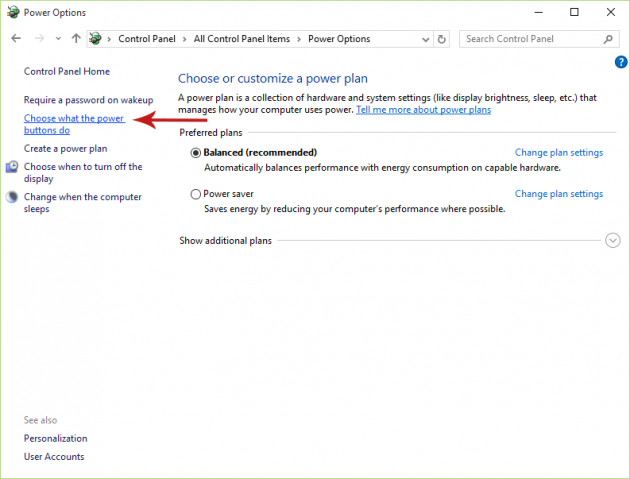
Step 4: Navigate to ‘Choose what the power buttons do’ Menu
In the current window, look at the sidebar on the left for an item that says “Choose what the power buttons do” and click on it.
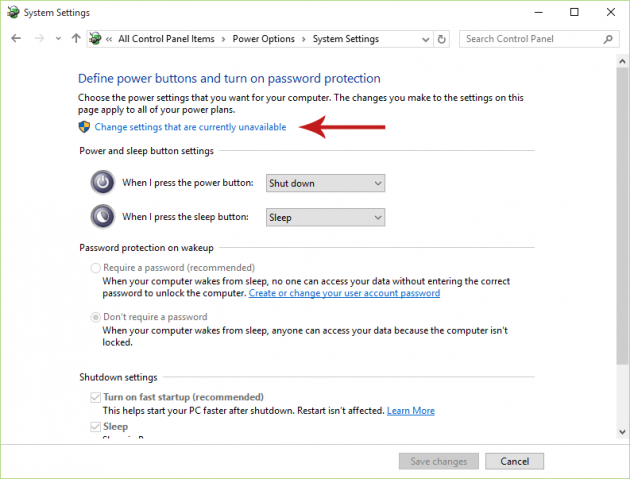
Step 5: Enable Settings that are Currently Unavailable
This screen has the setting we’re looking for at the bottom of the window, but you’ll notice that it’s greyed out. To be able to change it, click on the Change settings that are currently unavailable link at the top of the window first (click Yes if prompted by UAC).
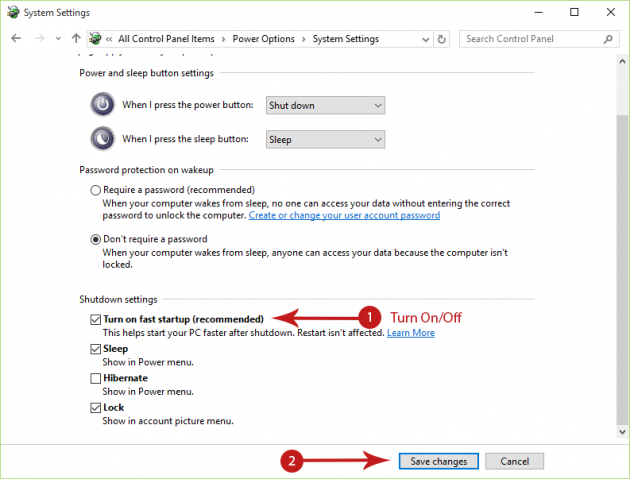
Step 6: Turn On/Off Fast Startup
Now we can configure the Fast Startup setting. Scroll down to the bottom of the window, check the “Turn on fast startup” option and click Save changes to enable Fast Startup. If you want to disable it, uncheck the option instead.
Method 2 - Turn On/Off Fast Startup by Tweaking the Registry
You can follow the steps below to tweak the registry manually in order to enable/disable Fast Startup, or you can jump at the end of the instructions and use the registry files we provide to automatically enable/disable it without messing with the Registry Editor.
Step 1: Open the Registry Editor
Press Win + R (“Win” is the Windows key in your keyboard) to open the Run dialog box, type “regedit” in it (without quotes) and press Enter. The Registry Editor will appear.
Step 2: Locate the Correct Registry Key
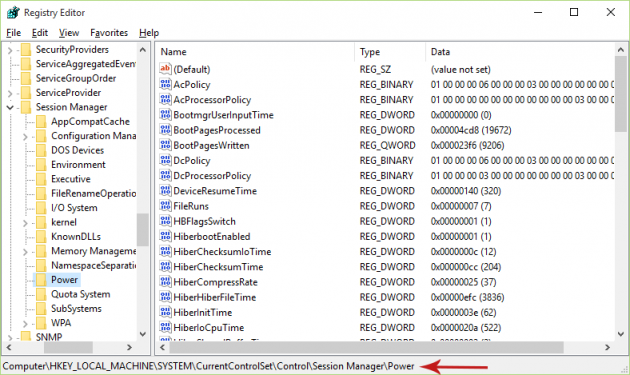
From the Registry Editor’s sidebar on the left, navigate to the following directory:
HKEY_LOCAL_MACHINE\SYSTEM\CurrentControlSet\Control\Session Manager\Power
Step 3: Edit the Appropriate Registry Value
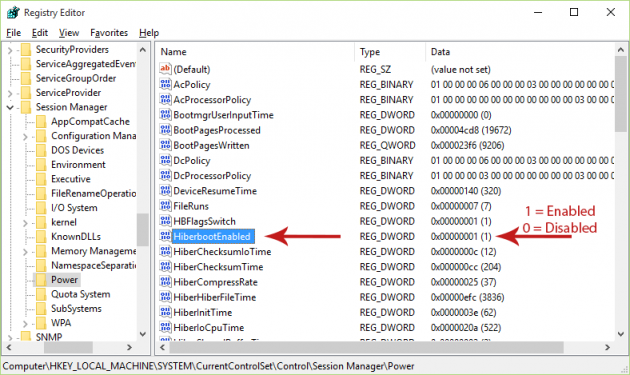
In the current registry key find this DWORD registry value: HiberbootEnabled. If its data is set to 0 then Fast Startup is disabled, and if it’s set to 1, then Fast Startup is enabled. So double-click on the registry value, edit the Data textbox in the window that opens (type 1 or 0 depending on whether you want to enable or disable the setting) and then click OK.
Below are two registry files that you can use to apply the registry changes automatically. Simply download and double-click on the registry file you want to use (also click Yes in the confirmation message that will pop up):
If you have any questions or problems, then let us know by posting in the comments section below and we’ll definitely try to help you out!


